Continuous Delivery with Cloud Build & Cloud Run
The intent of this blog post is to try out the serverless container platform, Cloud Run and to document the steps to perform continuous deployment using Cloud Build. I’ll also talk about the new kid in town, Cloud Build Button, which allow you to deploy your application to GCP using Cloud Run directly from your source repository.
The source code I’m using for this demo is a simple Inventory app written in GO, which expose a set of endpoints for CRUD operations. If you are curious about the app implementation details, check out this link.
Serverless compute options on GCP
Serverless computing is a paradigm shift in application development that enables developers to focus on writing code without worrying about infrastructure. It offers a variety of benefits over traditional computing, including zero server management, no up-front provisioning, auto-scaling, and paying only for the resources used.
If you are running on Google Cloud, you may wonder what Serverless computing platform is good for your workload. There are three options available: Cloud Functions, Cloud Run and App Engine Standard Environment. Depending of your workload type you may select one over the other. Some guidelines are documented here.
Some considerations for serverless compute platforms:
- All the above products scales to zero if they are not used
- All of them are included in free tier
- Cloud Run allows you to run your language of choice, while Cloud Function and App Engine Standard are limited to the number of languages supported
- Request time out varies on platforms from 1 minute to 15 minutes
- Different use cases, complex web application are best suited for App Engine, event-driven processing scripts fit best to Cloud Functions, and for provider agnostic stateless applications Cloud Run is a solution.
- Cloud Functions have a fixed concurrency of 1, while Cloud Run container instances and App Engine can receive many requests at the same time to the same instance
- Cloud Run containers can be only called by HTTP requests while Cloud Functions can be triggered by HTTP requests but also by events triggered on the Google Cloud environment
What is Cloud Run:
Cloud Run lets developers run stateless HTTP-driven containers on a fully managed serverless execution environment. It comes in two flavors, fully managed Cloud Run which is using Google infrastructure, or Cloud Run on Anthos/GKE. It enables you to run request or event-driven stateless workloads without worrying about infrastructure and it scales to zero if there is no traffic. Cloud Run is built on the Knative open-source project, enabling portability of your workloads across platforms.
There are similar products offered by other cloud vendors, like Amazon Fargate , which runs your container in the cloud without having to manage the infrastructure.
As long as your project adheres to Container Runtime Contract requirements, you can run any application written in any programming language on Cloud Run.
Below are some key requirements:
- the container must listen for requests on 0.0.0.0 on the port defined by the PORT environment variable, usually 8080
- the container instances must start an HTTP server within 4 minutes after receiving a request
- it uses an in-memory filesystem, so writing to it uses the container instance’s memory which is volatile
- the container is scaled to zero when it does not receive any traffic
- computation should be limited to the scope of a request
- the service should be stateless
- the container instance can get up to 2 GiB memory, default is 256 MiB
- each container instance can receive more than one request at the same time, max to 80
Cloud Run Button
Cloud Run Button is a quick and a cool way to run your application on the cloud by simply pushing the button from the GitHub repository. You just have to add the image and the link to the README file of the source code repository and your code can be deployed to cloud using Cloud Run.
When you click the Cloud Run Button to deploy an application, it packages the application source code as a container image, pushes it to Google Container Registry, and deploys it on Cloud Run.
Let’s create the Dockerfile:
# Use a Docker multi-stage build to create a lean production image.
# Use the offical Golang image to create a build artifact.
FROM golang as builder

# Copy local code to the container image.
WORKDIR /src/app
COPY go.mod ./
RUN go mod download
COPY . .

# Build the outyet command inside the container.
# RUN CGO_ENABLED=0 GOOS=linux go build -v -o hello
RUN CGO_ENABLED=0 go build -o /inventory-app -ldflags="-w -s" .

# Copy the binary to the production image from the builder stage.
FROM alpine
COPY --from=builder /inventory-app /inventory-app
ENTRYPOINT ["/inventory-app"]
How to add the Cloud Run Button to Your Repo’s README file
Copy & paste this markdown:
[](https://console.cloud.google.com/cloudshell/editor?shellonly=true&cloudshell_image=gcr.io/cloudrun/button&cloudshell_git_repo=YOUR_HTTP_GIT_URL)
Replace YOUR_HTTP_GIT_URL with your HTTP git URL, like: https://github.com/danrusei/cloud-run-cd.git
If the repo contains a Dockerfile it will be built using the docker build command. Otherwise, the CNCF Buildpacks will be used to build the repo.
The button will look like this:
Customizing source repository parameters
- to use a different git branch, add a cloudshell_git_branch=BRANCH_NAME query parameter.
- to run the build in a subdirectory of the repo, add a cloudshell_working_dir=SUBDIR query parameter.
Check out my script if you would like to test it out.
The result should be something similar with this:

Allow everyone to invoke your service:
Navigate to Cloud Run dashboard , go to Permissions → Add Member → Select allUsers → select Role Cloud Run Invoker → Save.
This is Dope !
However your code is evolving as you iterate over it for a number of times. Do you need to go every time to Github and push the button, you could but there is a better solution to this, meet the Cloud Build.
What is Cloud Build
Cloud Build lets you build software quickly across all languages. Get complete control over defining custom workflows for building, testing, and deploying across multiple environments such as VMs, serverless, Kubernetes, or Firebase.
It’s worth mentioning that Cloud Build is part of the free tier, and the first 120 build-minutes per day are free, which should be more than enough for small projects. Also it has native docker support and can automate deployments to Kubernetes.
Cloud Build executes your build as a series of build steps, where each build step is run in a Docker container, check out here detailed description of Cloud Build.
Required IAM permissions:
Cloud Build executes builds with the permissions granted to the Cloud Build service account tied to the project. In order to allow Cloud Build to run workloads over Cloud Run, you must grant additional roles to the service account:
- Go to Cloud Build → Settings → Enable Cloud Run Admin Role
- Go to IAM → Service Accounts → Select [PROJECT_NUMBER]-compute@developer.gserviceaccount.com → Show Info Panel → Add Member → Enter [PROJECT_NUMBER]@cloudbuild.gserviceaccount.com → Role dropdown → select Service Accounts → Service Account User → Click Save
Build and deploy the container:
Cloud Build allows you to build the container first, store the image in Container Registry, and then deploy the image to Cloud Run, which is exactly what we are going to do next.
The Dockerfile was created above, we need the cloudbuild.yaml file, which is a list of build steps that specifies the actions that you want Cloud Build to perform. For each build step, Cloud Build executes a docker container as an instance of docker run.
name: specify a cloud builder, which is a container image running common tools.
args: this field takes a list of arguments and passes them to the builder referenced by the name field. Arguments passed to the builder are passed to the tool that’s running in the builder, which allows you to invoke any command supported by the tool
steps:
# Build the container image
- name: 'gcr.io/cloud-builders/docker'
  args: ['build', '-t', 'gcr.io/$PROJECT_ID/cloud-run-cd', '.']
# Push the image to Container Registry
- name: 'gcr.io/cloud-builders/docker'
  args: ['push', 'gcr.io/$PROJECT_ID/cloud-run-cd']
# Deploy image to Cloud Run
- name: 'gcr.io/cloud-builders/gcloud'
  args: ['beta', 'run', 'deploy', 'cloud-run-cd', '--image', 'gcr.io/$PROJECT_ID/cloud-run-cd', '--region', 'us-central1', '--platform', 'managed', '--allow-unauthenticated']
images:
- gcr.io/$PROJECT_ID/cloud-run-cd
Create Cloud Build triggers
You should configure your triggers to build and deploy images whenever you update your source code.
- Open the Build Triggers page in the Google Cloud Platform Console.
- Select your project and click Open.
- Click Add trigger.
- Select the repository where your build source is stored.
- Enter a name/description for your trigger.
- Trigger Type: You can set a trigger to start a build on commits to a particular branch, or on commits that contain a particular tag.
- Build Configuration: Select the Cloud Build config file you create previously.
- Click Create trigger to save the build trigger.
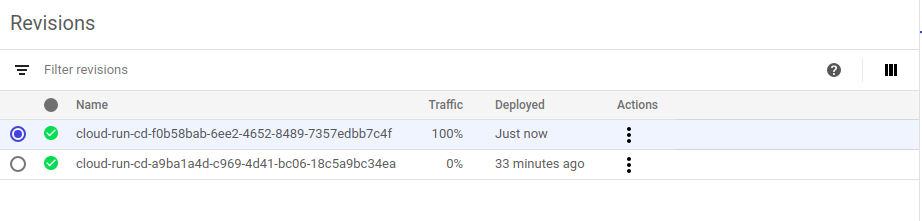
Once done, make a change to your scripts and push it to source code repository. You’ll immediately observe that the Cloud Build started to build your service and the traffic will be switched to the new instance.
Conclusion
Setting up continuous deployment is pretty easy on GCP, and using the Cloud Run Button is fun. Hopefully this article is useful to you.