Part 3: Microservices - Deploy on Minikube
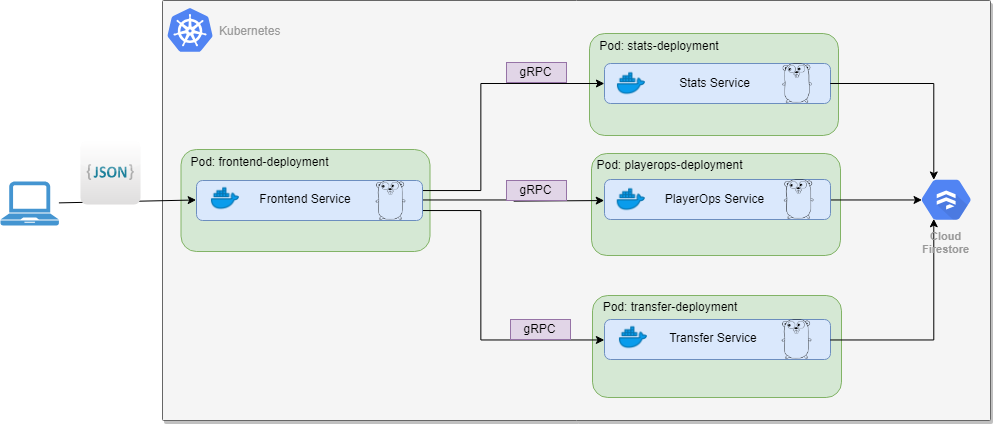
In my previous blog posts I described the architecture I used to create the League App microservice and the communication between the services. Meantime, I have extended the League App by adding new services, which play specific roles. PlayerOps service perform CRUD operation over the player database, I have implemeneted just Create and Delete player functions but this can be extended easily to Read and Update . Transfer service is used to move a player from one team to another, affecting receiving/outgoing team’s capital. I used the same architecture as it was detailed in the last posts, though the functions have different scopes. The new added services can be found in the Section_3 of the project.
The end state of the League app deployed on Minikube:
Now, with the microservice App created, you can test it out locally by building up each service and setting up the environment variables. That’s fine, but ultimately you may want to deploy it on a platform in production. One of the most adopted solution these days is to package those up in containers and deploy over a container orchestration platform. I’m using docker as a container engine and Kubernetes as a orchestration platform for containers. In this post I’m going to walk you through the steps of creating the containers and deploying to Minikube, which is a single-node Kubernetes cluster inside a Virtual Machine (VM), that can run on the local machine.
Create the Docker file
A Docker container image is a lightweight, standalone, executable package of software that includes everything needed to run an application: code, runtime, system tools, system libraries and settings. Unlike the virtual machine, that creates a whole virtual operating system, Docker allows applications to use the same Linux kernel as the system that they’re running on and only requires applications be shipped with things not already running on the host computer. This gives a significant performance boost and reduces the size of the application.
There is a huge amount of resources out there explaining the container concepts and their benefits over virtual machines, a good place to start with is the official website.
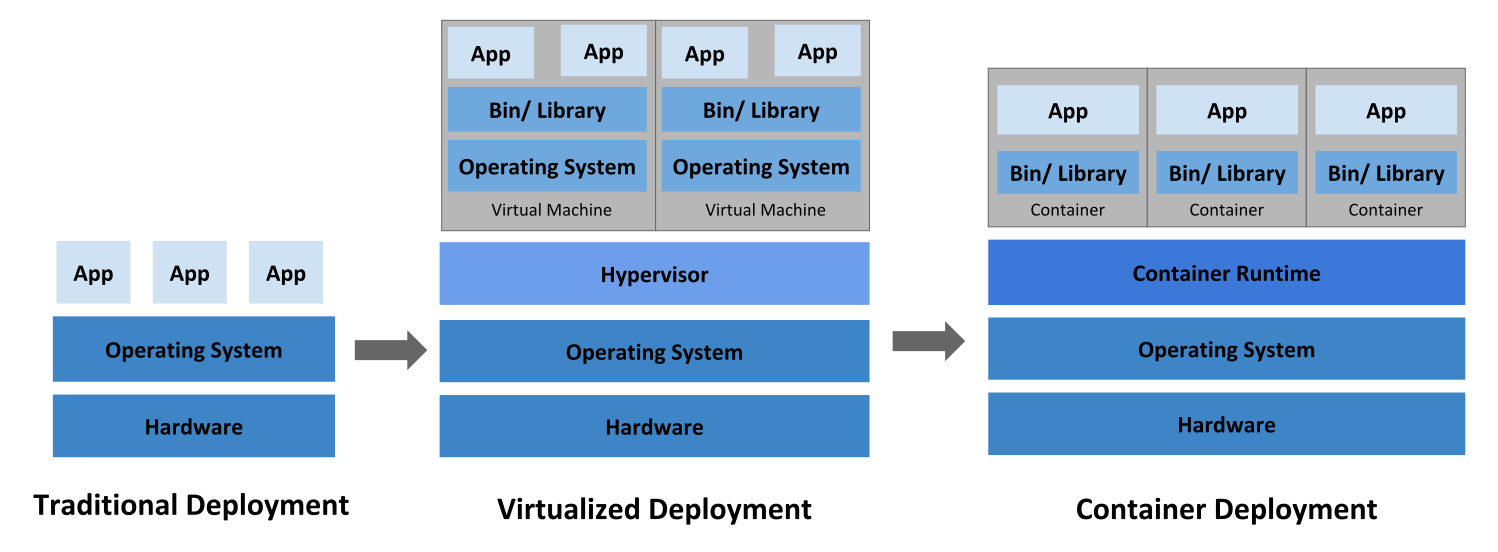
- image from kubernetes.io website, the evolution of app depoyment
Below I create a multi-stage build container. I could have built the binaries locally and copy to a small container as alpine, or I could have run it directly from the golang container. The benefits of multi-stage build is that you don’t have to build the binaries on your system and also by copying only the executable to lightweight container as alpine makes the container to be small, faster and secure.
# This is a multi-stage build ("builder" create the binary, "release" run the app)
# Fist Stage: builder
# Use base golang image from Docker Hub
FROM golang:1.12-alpine AS builder
# Install ca-certificates bundle & git inside the docker image
RUN apk add --no-cache ca-certificates git

# Sets the working directory
WORKDIR /microservices_project/section_3/frontend
# Copy the application source code including go.mod and go.sum files
COPY . .
# Download dependencies
RUN go mod download

# Compile the application to /frontend.
RUN go build -ldflags="-w -s" -o /frontend main.go

# Second Stage: release
FROM alpine as release
# Install ca-certificates bundle & git inside the docker image
RUN apk add --no-cache ca-certificates
# Sets the working directory
WORKDIR /frontend
# Copies new files or directories from src to dst
COPY --from=builder /frontend ./server
# Informs Docker that the container listens on the specified network ports at runtime
EXPOSE 8082
# Configure a container that will run as an executable
ENTRYPOINT ["/frontend/server"]
What is Kubernetes
Kubernetes is a portable, extensible, open-source platform for managing containerized workloads and services. Containers are a good way to bundle and run your applications. In a production environment, you need to manage the containers that run the applications and ensure that there is no downtime. For example, if a container goes down, another container needs to start. This is where Kubernetes excell.
Kubernetes orchestration allows you to build application services that span multiple containers, schedule those containers across a cluster, scale those containers, and manage the health of those containers over time.
To work with Kubernetes, you use Kubernetes API objects to describe your cluster’s desired state: what applications or other workloads you want to run, what container images they use, the number of replicas, what network and disk resources you want to make available, and more. You set your desired state by creating objects using the Kubernetes API, typically via the command-line interface, kubectl.
Kubernetes Objects are persistent entities in the Kubernetes system. Kubernetes uses these entities to represent the state of your cluster. The basic objects are Pod, Service, Volume and Namespace. In addition, Kubernetes contains a number of higher-level abstractions called Controllers, like ReplicaSet & Deployment. Below you’ll see me using both Deployment and services.
- The Deployment provides declarative updates for Pods and ReplicaSets.
- A Pod is a group of one or more containers (such as Docker containers), with shared storage/network, and a specification for how to run the containers.
- The Service is an abstraction which defines a logical set of Pods and a policy by which to access them
Prepare Local environment
We will deploy the microservices app on the local kubernetes cluster. Therefore we need Minikube, or Docker for Desktop in case you use Windows or MacOS. Minikube runs a single-node Kubernetes cluster inside a Virtual Machine (VM) on your laptop. It has some dependencies, Kubectl and hypervisor (like VirtualBox) has to be installed on the computer.
Skaffold is needed as well, it’s not a minikube requirement, but still it is very usefull tool. Skaffold is a command line tool that facilitates continuous development for Kubernetes applications. You can iterate on your application source code locally then deploy to local or remote Kubernetes clusters. Skaffold handles the workflow for building, pushing and deploying your application.
Cloud Code for VS Code extends VS Code to bring all the power and convenience of IDEs to developing cloud-native Kubernetes applications. Under the hood the Cloud Code uses tools such as Skaffold and Kubectl to easily deploy your code on local kubernetes cluster or in the cloud. It support debugging, code completion, linting and snippets, which I’ll use to create the manifest files. The official documentation presents all its capabilities or you could watch this youtube video, which cover alot of concepts.
Cloud Code streamline the yaml manifest files creation, using snippets. You just have to type Ctrl+Tab in the .yaml file and it show the options to autopopulate with Kubernetes Deployment, Service, ConfigMap, Ingress, Pod sample config. Below are the manifests for the Frontend service, similar we can create Deployments for the Stats, PlayerOps and Transfer services. Check out the kubernetes manifests over Here.
Create the Deployment (the below config is generated by Cloud Code):
apiVersion: apps/v1
kind: Deployment
metadata:
  name: frontend-deployment
spec:
  selector:
    matchLabels:
      app: frontend
  template:
    metadata:
      labels:
        app: frontend
    spec:
      containers:
      - name: frontend
        image: frontend-image
        resources:
          requests:
            memory: "32Mi"
            cpu: "100m"
          limits:
            memory: "128Mi"
            cpu: "500m"
        ports:
        - containerPort: 8080
        env:
          - name: port
            value: "8080"
          - name: STATS_SERVICE_ADDR
            value: "stats-service:8081"
          - name: PLAYER_SERVICE_ADDR
            value: "playerops-service:8082"
          - name: TRANSFER_SERVICE_ADDR
            value: "transfer-service:8083"
The services have to be able to discuss between each other. Kubernetes supports 2 primary modes of finding a Service: environment variables and DNS. I’m using environment variable to notify the frontend app of the addresses of the other services. When a Pod is run on a Node, the kubelet adds a set of environment variables for each active Service.
The recommended way is to set up a DNS service for your Kubernetes cluster by using add-ons. A cluster-aware DNS server, such as CoreDNS, watches the Kubernetes API for new Services and creates a set of DNS records for each one. If DNS has been enabled throughout your cluster then all Pods should automatically be able to resolve Services by their DNS name.
Create the Service:
apiVersion: v1
kind: Service
metadata:
  name: frontend-service
spec:
  type: NodePort
  selector:
    app: frontend
  ports:
  - port: 80
    targetPort: 8080
In order to access the app, you must configure the frontend Service to be externally visible, so a client can request the Service from outside the container cluster. Minikube can only expose Services through NodePort. All the other services can use ClusterIP type instead, which means they are not accessible outside container cluster. This is exactly what I want as they are backend services.
Wth all the manifest files created for all Services, we can deploy to a local cluster. Start the minikube first:
$ minikube start
😄  minikube v1.2.0 on linux (amd64)
🔥  Creating virtualbox VM (CPUs=2, Memory=2048MB, Disk=20000MB) ...
🐳  Configuring environment for Kubernetes v1.15.0 on Docker 18.09.6
🚜  Pulling images ...
🚀  Launching Kubernetes ...
⌛  Verifying: apiserver proxy etcd scheduler controller dns
🏄  Done! kubectl is now configured to use "minikube"
Once minikube has started, check out the cluster config details:
$ kubectl config view
apiVersion: v1
clusters:
- cluster:
    certificate-authority: /home/{user}/.minikube/ca.crt
    server: https://192.168.99.105:8443
  name: minikube
contexts:
- context:
    cluster: minikube
    user: minikube
  name: minikube
current-context: minikube
kind: Config
preferences: {}
users:
- name: microservices
  user:
    client-certificate: /home/{user}/.minikube/client.crt
    client-key: /home/{user}/.minikube/client.key
- name: minikube
  user:
    client-certificate: /home/{user}/.minikube/client.crt
    client-key: /home/{user}/.minikube/client.key
Then we have to create the docker images, push to repository and apply the Deployments manifests, which will create the Pods and Services. We can do this manually but I prefer the automated process offered by skaffold. Manually it would look like this:
// for each service, execute following commands:
$ docker build -t $DOCKER_ACC/$DOCKER_REPO:$IMG_TAG .
// DOCKER_ACC is the name of your account $DOCKER_REPO is your image name and $IMG_TAG is your tag
$ docker push $DOCKER_ACC/$DOCKER_REPO:$IMG_TAG

// with all containers created, apply the Deployments manifests:
$  kubectl apply -f *.yaml
VS Code with Cloud Code extension enabled makes the flow easier. Open the Command Pallette (Ctrl+Shift+P) and select Cloud Code: Deploy. Select the Deployment Profile, if there is none, it will lunch a Deployment Profile Wizard. For each image to be built, we can select the artifact’s source (its the path relative to the corresponding Dockerfile) from the dropdown list. If there are multiple Dockerfiles in the project, they’ll all be displayed in this list.
There is still one thing we have to do, to make the service account key available for stats, playerops and transfer containers, without it the services will not be allowed to access the Firestore cloud database. To use a service account outside of GCP, such as on other platforms or on-premises, you must first establish the identity of the service account. Public/private key pairs let you do that. Details on how to create and manager the service account keys can be found Here.
Due to security reasons you don’t want to copy the file in the containers, fortunately kubernetes has a better solution for us. Use the secret object, which let you store and manage sensitive information, such as passwords, OAuth tokens, and ssh keys. As per their documentation:
“A Secret is an object that contains a small amount of sensitive data such as a password, a token, or a key. Such information might otherwise be put in a Pod specification or in an image; putting it in a Secret object allows for more control over how it is used, and reduces the risk of accidental exposure. To use a secret, a pod needs to reference the secret. A secret can be used with a pod in two ways: as files in a volume mounted on one or more of its containers, or used by kubelet when pulling images for the pod. "
Create the secret object:
$ kubectl create secret generic firestore-secret --from-file=service_account_key=apps-microservices-68b9b8c44847.json
Verify if it was created:
$ kubectl describe secret firestore-secret

Name:         firestore-secret
Namespace:    default
Labels:       <none>
Annotations:  <none>

Type:  Opaque

Data
====
service_account_key:  2339 bytes
Secrets can be mounted as data volumes, modify the Deployment definition to add a volume under .spec.volumes[]:
volumes:
- name: service-key
  secret:
    secretName: firestore-secret
    items:
    - key: service_account_key
      path: apps-microservices-68b9b8c44847.json
Add a .spec.containers[].volumeMounts[] to each container that needs the secret:
volumeMounts:
- name: service-key
  mountPath: /root/apps-microservices-68b9b8c44847.json
  subPath: apps-microservices-68b9b8c44847.json
Finally verify if all services are up and running:
$ kubectl get all
NAME                                        READY   STATUS    RESTARTS   AGE
pod/frontend-deployment-f6cf97787-75j8b     1/1     Running   0          178m
pod/playerops-deployment-68f7d775db-97tq9   1/1     Running   0          178m
pod/stats-deployment-745d94898-96br6        1/1     Running   0          178m
pod/transfer-deployment-57b66574ff-xt28x    1/1     Running   0          178m


NAME                        TYPE        CLUSTER-IP      EXTERNAL-IP   PORT(S)        AGE
service/frontend-service    NodePort    10.103.106.51   <none>        80:32336/TCP   178m
service/kubernetes          ClusterIP   10.96.0.1       <none>        443/TCP        3h5m
service/playerops-service   ClusterIP   10.103.104.60   <none>        8082/TCP       178m
service/stats-service       ClusterIP   10.103.114.96   <none>        8081/TCP       178m
service/transfer-service    ClusterIP   10.99.43.1      <none>        8083/TCP       178m


NAME                                   READY   UP-TO-DATE   AVAILABLE   AGE
deployment.apps/frontend-deployment    1/1     1            1           178m
deployment.apps/playerops-deployment   1/1     1            1           178m
deployment.apps/stats-deployment       1/1     1            1           178m
deployment.apps/transfer-deployment    1/1     1            1           178m

NAME                                              DESIRED   CURRENT   READY   AGE
replicaset.apps/frontend-deployment-f6cf97787     1         1         1       178m
replicaset.apps/playerops-deployment-68f7d775db   1         1         1       178m
replicaset.apps/stats-deployment-745d94898        1         1         1       178m
replicaset.apps/transfer-deployment-57b66574ff    1         1         1       178m
The League application is deployed to Minikube, on the local cluster. Find the IP address to access the app.
$  minikube service frontend-service --url
http://192.168.99.105:32336
Let’s test it out using the above endpoint ip address. List the top 3 Forward players, based on the script logic:
curl --header "Content-Type: application/json" --request GET --data '{"position":"Forward"}' http://192.168.99.105:32336/bestposition
the result:
"Players":[{"name":"Mohamed Salah","team":"Liverpool","nationality":"Egypt","position":"Forward","appearences":38,"goals":22,"assists":8,"passes":1079,"interceptions":5,"tackles":21,"fouls":25,"price":0},
{"name":"Sadio Mane","team":"Liverpool","nationality":"Senegal","position":"Forward","appearences":36,"goals":22,"assists":1,"passes":1184,"interceptions":15,"tackles":34,"fouls":34,"price":0},
{"name":"Sergio Aguero","team":"Manchester City","nationality":"Argentina","position":"Forward","appearences":33,"goals":21,"assists":8,"passes":771,"interceptions":9,"tackles":17,"fouls":21,"price":0}],"Err":null}
List the stats of all the teams from the database:
curl --header "Content-Type: application/json" --request GET --data '{"league":"League"}' http://192.168.99.105:32336/table
the result:
{"teams":[{"teamName":"Manchester City","teamPlayed":38,"teamWon":32,"teamDrawn":2,"teamLost":4,"teamGF":95,"teamGA":23,"teamGD":72,"teamPoints":98,"teamCapital":300},
{"teamName":"Liverpool","teamPlayed":38,"teamWon":30,"teamDrawn":7,"teamLost":1,"teamGF":89,"teamGA":22,"teamGD":67,"teamPoints":97,"teamCapital":250},
{"teamName":"Chelsea","teamPlayed":38,"teamWon":21,"teamDrawn":9,"teamLost":8,"teamGF":63,"teamGA":39,"teamGD":24,"teamPoints":72,"teamCapital":200},
{"teamName":"Tottenham Hotspur","teamPlayed":38,"teamWon":23,"teamDrawn":2,"teamLost":13,"teamGF":67,"teamGA":39,"teamGD":28,"teamPoints":71,"teamCapital":150}],"err":null}
Remember, the above results are from Frontend and Stats services communication. Let’s do some queries which involve PlayerOps and Transfer services as well.
Create a new player, which invoke PlayerOps service. It requires a payload of this type:
{
  "NewPlayer": {
	  "Name": "Gabriel Jesus",
	  "Team": "Manchester City",
	  "Nationality": "Brazil",
	  "Position": "Forward",
	  "Appearences": 29,
	  "Goals": 7,
	  "Assists": 3,
	  "Passes": 357,
	  "Interceptions": 3,
	  "Tackles": 10,
	  "Fouls": 12,
	  "Price": 70
  }
}
Then issue the command:
$ curl --header "Content-Type: application/json" --request GET --data "@newplayer.json" http://192.168.99.105:32336/createplayer

{"Ops":"Player Gabriel Jesuswas created at 2019-07-19 18:31:30.719902 +0000 UTC","Err":null}
Transfer Gabriel Jesus player from Manchester City to Chelsea, which invokes Transfer Service:
$ curl --header "Content-Type: application/json" --request GET --data '{"PlayerName":"Gabriel Jesus", "TeamFrom":"Manchester City", "TeamTO":"Chelsea"}' http://192.168.99.105:32336/transferplayer

{"Ops":"Player Gabriel Jesus has been transfered to Chelsea from Manchester City at 2019-07-19 18:38:01.581106 +0000 UTC","Err":null}
Let’s examine each Pod logs, to see if everything went well. Frontend Service Logs:
$ kubectl logs -f frontend-deployment-f6cf97787-75j8b

level=info ts=2019-07-19T13:04:56.297623985Z caller=main.go:42 msg="Frontend service started"
level=info ts=2019-07-19T13:04:56.298556566Z caller=main.go:71 transport=HTTP addr=:8080
ts=2019-07-19T18:02:18.5059438Z caller=middleware.go:40 method=GetPositionBestPlayers position=Forward err=null
ts=2019-07-19T18:18:23.058855331Z caller=middleware.go:26 method=GetTable league=League err=null
ts=2019-07-19T18:31:30.718193738Z caller=middleware.go:47 method=CreatePlayer player="Gabriel Jesus" err=null
ts=2019-07-19T18:38:01.606481742Z caller=middleware.go:61 method=TransferPlayer player="Gabriel Jesus" FromTeam="Manchester City" ToTeam=Chelsea err=null
Stats Service Logs:
$ kubectl logs -f stats-deployment-745d94898-96br6

level=info ts=2019-07-19T13:09:06.497137129Z caller=main.go:32 msg="Stats service started"
level=info ts=2019-07-19T13:09:06.506817889Z caller=main.go:69 transport=GRPC addr=:8081
ts=2019-07-19T18:02:18.505364165Z caller=middleware.go:40 method=ListPostionPlayers position=Forward err=null
ts=2019-07-19T18:18:23.057843921Z caller=middleware.go:26 method=Listable league=League err=null
PlayerOps Service Logs:
$ kubectl logs -f playerops-deployment-68f7d775db-97tq9

level=info ts=2019-07-19T13:09:06.5755031Z caller=main.go:31 msg="PlayerOps service started"
level=info ts=2019-07-19T13:09:06.586213351Z caller=main.go:68 transport=GRPC addr=:8082
ts=2019-07-19T18:31:30.715147025Z caller=middleware.go:26 method=CreatePlayer player="Gabriel Jesus" err=null
Transfer Service Logs:
$ kubectl logs -f transfer-deployment-57b66574ff-xt28x

level=info ts=2019-07-19T13:09:06.87143514Z caller=main.go:31 msg="Transfer service started"
level=info ts=2019-07-19T13:09:06.871846095Z caller=main.go:68 transport=GRPC addr=:8083
ts=2019-07-19T18:38:01.604958439Z caller=middleware.go:26 method=TransferPlayer player="Gabriel Jesus" from="Manchester City" to=Chelsea err=null
To stop a running local kubernetes cluster, without deleting it:
$ minikube stop
For cleaning it up, run the following command, which will delete all Pods, Deployments, and Services.
$ minikube delete
Conclusion:
In this post I walked you through the deployment process, from containerization of the application to deployment to local cluster. I used Cloud Code extension for VS Code to create the manifests, iterate over the application source code locally and automatically deploy to minikube, a single-node Kubernetes cluster.
The complete code is available on Github.
Although the League application is running on the cluster, this is not yet production ready. The application has to scale out and in automatically based on the traffic patterns. Also a modern microservice application lets you control the flow of traffic and API calls between services, gives you deep insights into your service mesh deployment through logs and metrics and create a secure communication channel between services.
Last step in this journey is to deploy the League App on a managed kubernetes cluster on the cloud (GKE) with ISTIO enabled in a atempt to solve some of the problems listed above.