Part 4: Microservices - Deploy on GKE + Istio
This the last blog post from a series of 5, where I dived into the process of creating and deploying a microservice project, named League App. It is a toy project but my intention was to showcase the technologies I used along the path from creation to deployment.
In the previous blog post I deployed the League App locally, which is fine for fast development. But you’ll get into a point where you want to make the App available for the rest of the world. Same time the app logs may not suffice, you need to monitor, manage and secure your microservices app. This is what I’m going to cover in this blog post by deploying the app on a managed Kubernetes cluster in cloud with ISTIO plugin enabled.
Create a GKE cluster
When you create a Service of type LoadBalancer, a Google Cloud controller wakes up and configures a network load balancer in your project. The load balancer has a stable IP address that is accessible from outside of your project.
A GKE cluster is a managed set of Compute Engine virtual machines (VMs) that operate as a single GKE cluster. GKE clusters are powered by the Kubernetes open source cluster management system. I’m creating a 4 nodes cluster of n1-standard-2 machine type:
gcloud container clusters create microservices \
  --cluster-version latest \
  --machine-type=n1-standard-2 \
  --num-nodes 4
To run Istio, it is recommend at least 4 nodes and the n1-standard-2 machine type. When the cluster is ready, the command outputs a message similar to the following:
kubeconfig entry generated for microservices.
NAME           LOCATION        MASTER_VERSION  MASTER_IP      MACHINE_TYPE   NODE_VERSION  NUM_NODES  STATUS
microservices  europe-west1-b  1.13.7-gke.8    35.195.21.182  n1-standard-2  1.13.7-gke.8  4          RUNNING
Ensure that the kubectl version is the same or more recent than your cluster. You can verify that you are using the latest version by running kubectl version:
Client Version: version.Info{Major:"1", Minor:"15", GitVersion:"v1.15.0", GitCommit:"e8462b5b5dc2584fdcd18e6bcfe9f1e4d970a529", GitTreeState:"clean", BuildDate:"2019-06-19T16:40:16Z", GoVersion:"go1.12.5", Compiler:"gc", Platform:"linux/amd64"}
Server Version: version.Info{Major:"1", Minor:"13+", GitVersion:"v1.13.7-gke.8", GitCommit:"7d3d6f113e933ed1b44b78dff4baf649258415e5", GitTreeState:"clean", BuildDate:"2019-06-19T16:37:16Z", GoVersion:"go1.11.5b4", Compiler:"gc", Platform:"linux/amd64"}
Provide credentials to the kubectl command-line tool so that you can use it to manage the cluster. If you are using an existing cluster, ensure that you have cluster credentials for kubectl on the machine where you want to run the installation commands. For example, the following command gets the credentials for a cluster called microservices:
gcloud container clusters get-credentials microservices
Fetching cluster endpoint and auth data.
kubeconfig entry generated for microservices.
You can run the following command to get the status of the nodes:
kubectl get nodes
NAME                                           STATUS   ROLES    AGE     VERSION
gke-microservices-default-pool-52c602a2-7jrs   Ready    <none>   5m58s   v1.13.7-gke.8
gke-microservices-default-pool-52c602a2-bs9r   Ready    <none>   5m57s   v1.13.7-gke.8
gke-microservices-default-pool-52c602a2-lqnx   Ready    <none>   5m57s   v1.13.7-gke.8
gke-microservices-default-pool-52c602a2-m47d   Ready    <none>   5m58s   v1.13.7-gke.8
Deploy the League App in the new GKE Cluster
As stated above, the frontend Service will use LoadBalancer type instead of NodePort, so I’m making the change in the manifest file.
I’m using Cloud Code extension for VsCode to deploy the app in the kubernetes cluster. In the previous blog post I described the reasons and benefits of using it.
Run Cloud Code: Deploy in the VSCode Command Palette. If you have not used this cluster before it will ask you to create a new deployment profile and associate the name of the image to be built with their respective Dockerfile. Select the cluster name and the image registry (eu.gcr.io/your_GCP_project). Cloud Code use skaffold behind the scene, which:
- builds the container images using docker
- pushes the images to GCR (google container registry)
- deploy the application to the kubernetes cluster by applying the ./kubernetes-manifests
Create the secret object, find the reason in my previous post:
$ kubectl create secret generic firestore-secret --from-file=service_account_key=apps-microservices-68b9b8c44847.json
Check the status of the services:
kubectl get all
NAME                                       READY   STATUS    RESTARTS   AGE
pod/frontend-deployment-65d6866bb9-4rmvb   1/1     Running   0          4m42s
pod/playerops-deployment-78bf475d8-c2mtc   1/1     Running   0          4m41s
pod/stats-deployment-57459fb964-66vzb      1/1     Running   0          4m41s
pod/transfer-deployment-586c4bc99-4dv64    1/1     Running   0          4m41s


NAME                        TYPE           CLUSTER-IP     EXTERNAL-IP    PORT(S)        AGE
service/frontend-service    LoadBalancer   10.108.2.33    35.233.92.75   80:32179/TCP   4m42s
service/kubernetes          ClusterIP      10.108.0.1     <none>         443/TCP        41m
service/playerops-service   ClusterIP      10.108.11.58   <none>         8082/TCP       4m41s
service/stats-service       ClusterIP      10.108.15.87   <none>         8081/TCP       4m41s
service/transfer-service    ClusterIP      10.108.5.141   <none>         8083/TCP       4m41s


NAME                                   READY   UP-TO-DATE   AVAILABLE   AGE
deployment.apps/frontend-deployment    1/1     1            1           4m42s
deployment.apps/playerops-deployment   1/1     1            1           4m41s
deployment.apps/stats-deployment       1/1     1            1           4m41s
deployment.apps/transfer-deployment    1/1     1            1           4m41s

NAME                                             DESIRED   CURRENT   READY   AGE
replicaset.apps/frontend-deployment-65d6866bb9   1         1         1       4m42s
replicaset.apps/playerops-deployment-78bf475d8   1         1         1       4m41s
replicaset.apps/stats-deployment-57459fb964      1         1         1       4m41s
replicaset.apps/transfer-deployment-586c4bc99    1         1         1       4m41s
As you can see above we got an EXTERNAL-IP address and can be used for the application requests
curl --header "Content-Type: application/json" --request GET --data '{"position":"Forward"}' http://35.233.92.75/bestposition
the answer:
{"Players":[{"name":"Mohamed Salah","team":"Liverpool","nationality":"Egypt","position":"Forward","appearences":38,"goals":22,"assists":8,"passes":1079,"interceptions":5,"tackles":21,"fouls":25,"price":0},
{"name":"Sadio Mane","team":"Liverpool","nationality":"Senegal","position":"Forward","appearences":36,"goals":22,"assists":1,"passes":1184,"interceptions":15,"tackles":34,"fouls":34,"price":0},
{"name":"Sergio Aguero","team":"Manchester City","nationality":"Argentina","position":"Forward","appearences":33,"goals":21,"assists":8,"passes":771,"interceptions":9,"tackles":17,"fouls":21,"price":0}],"Err":null}
Now the League App is running, the same as it runs on in my local minikube environmnet, except it is runnigin th cloud now on a manage Kubernetes services, GKE.
Adopting microservices architecture brings a lot of benefits, including increased autonomy, flexibility, and modularity, but it comes with a cost.
- How do the services interact and how does traffic flow between the services?
- Metrics: How long does the server take to respond to incoming requests? How many requests per second (RPS) are inbound to the server? Are there any error responses?
- How do you make the application resilient using timeouts and retries ?
- How do you roll out new versions of your services?
- How do you secure and monitor the communication between containers?
There are two options which you could implement:
- Embed this functionalities within the application. In my case could be easy, as the GO-KIT was created with these functionalities as a first class citizen. Go kit tries to enforce a strict separation of concerns through the use of the middleware (or decorator) pattern. Middlewares can wrap endpoints or services to add functionality, such as logging, rate limiting, load balancing, or distributed tracing. It’s common to chain multiple middlewares around an endpoint or service.
- Use a service mesh: software that helps you orchestrate, secure, and collect telemetry across distributed applications. A service mesh transparently oversees and monitors all traffic for your application, typically through a set of network proxies that sit alongside each microservice.
I may try to expand script functionalities as well by demonstrating how to use it with GO-KIT. Usually the services need to be implemented using the same language across the application, but what if your core business services are written in Java, Python, Nodejs etc. Although all programing languages have microservices frameworks, to implement all functionalities (such as monitoring, logging, configuration, and networking services) consistently across all the services it is not an easy task. In this case, adopting a service mesh allows you to decouple your application from the network, and in turn, allows your operations and development teams to work independently.
Alongside IBM, Lyft, and others, Google launched Istio in 2016 as an open-source service mesh solution. Built on the high-performance Envoy proxy, Istio provides a configurable overlay on your microservices running in Kubernetes. It supports end-to-end encryption between services, granular traffic and authorization policies, and unified metrics— all without any changes to your application code.
What is ISTIO
Istio is an open service mesh that provides a uniform way to connect, manage, and secure microservices. It supports managing traffic flows between services, enforcing access policies, and aggregating telemetry data, all without requiring changes to the microservice code.
Istio’s easy rules configuration and traffic routing lets you control the flow of traffic and API calls between services. Istio simplifies configuration of service-level properties like circuit breakers, timeouts, and retries, and makes it a breeze to set up important tasks like A/B testing, canary rollouts, and staged rollouts with percentage-based traffic splits.
Istio’s robust tracing, monitoring, and logging features give you deep insights into your service mesh deployment. Gain a real understanding of how service performance impacts things upstream and downstream with Istio’s monitoring features, while its custom dashboards provide visibility into the performance of all your services and let you see how that performance is affecting your other processes.
An Istio service mesh is logically split into a data plane and a control plane.
- Data plane is composed of Envoy proxies deployed as sidecars. They controll all network communication between microservices along with Mixer.
- The control plane manages and configures the proxies to route traffic. Additionally, the control plane configures Mixers to enforce policies and collect telemetry.
ISTIO Components:

- Pilot provides service discovery for the Envoy sidecars, traffic management capabilities for intelligent routing (e.g., A/B tests, canary rollouts, etc.), and resiliency (timeouts, retries, circuit breakers, etc.).
- Mixer is a platform-independent component. Mixer enforces access control and usage policies across the service mesh, and collects telemetry data from the Envoy proxy and other services.
- Citadel enables strong service-to-service and end-user authentication with built-in identity and credential management.
- Galley is Istio’s configuration validation, ingestion, processing and distribution component.
Advantages of using a sidecar pattern:
- A sidecar is independent from its primary application in terms of runtime environment and programming language.
- The sidecar can access the same resources as the primary application.
- There’s no significant latency when communicating between services, as the sidecard sits in proximity
- Extend the functionality of the primary application
Install ISTIO
You have two options for installing Istio on GKE cluster. You can enable the Istio on GKE add-on, or you can install open source Istio on your cluster.
Istio on GKE lets you easily manage the installation and upgrade of Istio as part of the GKE cluster lifecycle, automatically upgrading your system to the most recent GKE-supported version of Istio with optimal control plane settings for most needs. If you are a cloud user and utilizing Stackdriver to monitor your infrastructure, good news is that the Istio Stackdriver adapter is installed along with the ISTIO core components.
If you need to use a more recent open source version of Istio, or want greater control over your Istio control plane configuration, it is recommended that you use the open source version of Istio rather than the Istio on GKE add-on. You can find instructions for installing open source Istio on GKE in Installing Istio on a GKE cluster.
Below I’m following the installation guide provided on Installing Istio on GKE
gcloud beta container clusters update microservices \
    --update-addons=Istio=ENABLED --istio-config=auth=MTLS_PERMISSIVE
Ensure the following Kubernetes services are deployed: istio-citadel, istio-egressgateway, istio-pilot, istio-ingressgateway, istio-policy, istio-sidecar-injector, and istio-telemetry (you’ll also see the other deployed services):
kubectl get service -n istio-system

NAME                     TYPE           CLUSTER-IP      EXTERNAL-IP      PORT(S)                                                                                                                                      AGE
istio-citadel            ClusterIP      10.108.0.53     <none>           8060/TCP,15014/TCP                                                                                                                           92s
istio-galley             ClusterIP      10.108.10.242   <none>           443/TCP,15014/TCP,9901/TCP                                                                                                                   93s
istio-ingressgateway     LoadBalancer   10.108.14.104   104.155.91.182   15020:30763/TCP,80:31380/TCP,443:31390/TCP,31400:31400/TCP,15029:31861/TCP,15030:32024/TCP,15031:31652/TCP,15032:30841/TCP,15443:30427/TCP   93s
istio-pilot              ClusterIP      10.108.0.190    <none>           15010/TCP,15011/TCP,8080/TCP,15014/TCP                                                                                                       92s
istio-policy             ClusterIP      10.108.6.177    <none>           9091/TCP,15004/TCP,15014/TCP                                                                                                                 93s
istio-sidecar-injector   ClusterIP      10.108.8.119    <none>           443/TCP                                                                                                                                      92s
istio-telemetry          ClusterIP      10.108.7.244    <none>           9091/TCP,15004/TCP,15014/TCP,42422/TCP                                                                                                       92s
promsd                   ClusterIP      10.108.7.161    <none>           9090/TCP
To let Istio actually manage your services, each service in your application needs to have an Envoy sidecar proxy running in its pod to proxy network traffic between it and other services, and to communicate with the Istio control plane. You can inject these manually by updating your pods’ Kubernetes configuration, or (the simpler option) you can use Istio’s webhooks-based automatic sidecar injection. By default, Istio sidecar auto-injection is disabled for all namespaces. To enable auto-injection in your-namespace, run:
kubectl label namespace default istio-injection=enabled
Injection occurs at pod creation time, any running pods must be restarted for the change to take effect, as the sidecar is added at pod creation time. Kill the running pod and verify a new pod is created with the injected sidecar.
kubectl delete pod -l app=frontend
kubectl delete pod -l app=playerops
kubectl delete pod -l app=stats
kubectl delete pod -l app=transfer
Now the League application has this form:
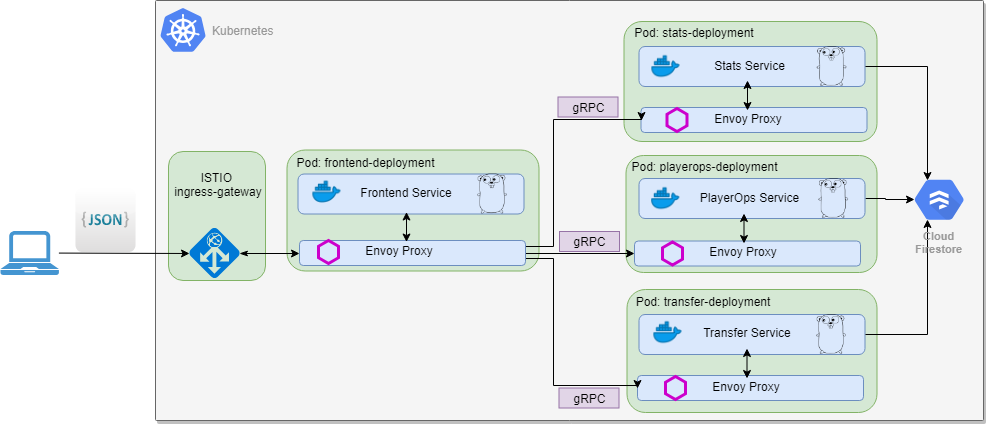
Verify if the pods are runnig with sidecar injected. The original pod has 1 / 1 READY containers and the pod with injected sidecar has 2 / 2 READY containers.
kubectl get pods

NAME                                   READY   STATUS    RESTARTS   AGE
frontend-deployment-65d6866bb9-clzjq   2/2     Running   0          74s
playerops-deployment-78bf475d8-tz7sj   2/2     Running   0          46s
stats-deployment-57459fb964-rhmfl      2/2     Running   0          30s
transfer-deployment-586c4bc99-2sf7b    2/2     Running   0          10s
Get the External IP:
kubectl get svc -n istio-system -l istio=ingressgateway
NAME                   TYPE           CLUSTER-IP      EXTERNAL-IP      PORT(S)                                                                                                                                      AGE
istio-ingressgateway   LoadBalancer   10.108.14.104   104.155.91.182   15020:30763/TCP,80:31380/TCP,443:31390/TCP,31400:31400/TCP,15029:31861/TCP,15030:32024/TCP,15031:31652/TCP,15032:30841/TCP,15443:30427/TCP   42m
If you reach this IP in your browser and you will get a Service Unavailable error, as by default Istio blocks any incoming traffic until we define a Gateway.
If you want to allow all HTTP traffic on port 80, for all hosts:
apiVersion: networking.istio.io/v1alpha3
kind: Gateway
metadata:
  name: leagueapp-gateway
spec:
  selector:
    istio: ingressgateway
  servers:
  - port:
      number: 80
      name: http
      protocol: HTTP
    hosts:
    - "*"
Apply the configuration by executing the command below:
kubectl apply -f istio-manifests/Leagueapp-gateway.yaml
gateway.networking.istio.io/leagueapp-gateway created
The gateway now allows access in port 80 but it has no concept where to route the requests. That is achieved using Virtual Services.
The VirtualService instructs the Ingress Gateway how to route the requests that were allowed into the cluster. For our application requests coming through the http-gateway must be routed to the frontend-service .
apiVersion: networking.istio.io/v1alpha3
kind: VirtualService
metadata:
  name: leagueapp-services
spec:
  hosts:
  - "*"
  gateways:
  - leagueapp-gateway
  http:
  - match:
    - uri:
        exact: /
    - uri:
        exact: /bestposition
    - uri:
        exact: /table
    - uri:
        prefix: "/bestplayers/"
    - uri:
        exact: /createplayer
    - uri:
        prefix: "/deleteplayer/"
    - uri:
        exact: /transferplayer
    route:
    - destination:
        host: frontend-service
        port:
          number: 80
The important points here are:
- This VirtualService applies to requests coming through the http-gateway.
- Destination defines the service where the requests are routed to.
then apply it:
kubectl apply -f istio-manifests/virtualservice-external.yaml
virtualservice.networking.istio.io/Leagueapp-services created
now the app is accesible through ISTIO, pay attention to the IP address I’m using below:
curl --header "Content-Type: application/json" --request GET --data '{"position":"Defender"}' http://104.155.91.182/bestposition
{"Players":[{"name":"Cesar Azpilicueta","team":"Chelsea","nationality":"Spain","position":"Defender","appearences":38,"goals":1,"assists":5,"passes":2483,"interceptions":43,"tackles":105,"fouls":39,"price":0},
{"name":"Marcos Alonso","team":"Chelsea","nationality":"Spain","position":"Defender","appearences":31,"goals":2,"assists":4,"passes":1881,"interceptions":39,"tackles":74,"fouls":28,"price":0},
{"name":"Andrew Robertson","team":"Liverpool","nationality":"Scotland","position":"Defender","appearences":36,"goals":0,"assists":11,"passes":2396,"interceptions":30,"tackles":80,"fouls":18,"price":0}],"Err":null}
Colect and visualize metrics:
First you have to install your own instance of Prometheus and make great visualization using Grafana.
Get your ISTIO installed version:
$kubectl get deployment istio-pilot -o yaml -n istio-system | grep image:

image: gke.gcr.io/istio/pilot:1.1.7-gke.0
image: gke.gcr.io/istio/proxyv2:1.1.7-gke.0
curl https://storage.googleapis.com/gke-release/istio/release/[istio-version]/patches/install-prometheus.yaml | kubectl apply -n istio-system -f -
Don’t know why but the last version didn’t worked for me, so I had to install from previous versions.
curl https://storage.googleapis.com/gke-release/istio/release/1.0.6-gke.3/patches/install-prometheus.yaml | kubectl apply -n istio-system -f -
  % Total    % Received % Xferd  Average Speed   Time    Time     Time  Current
                                 Dload  Upload   Total   Spent    Left  Speed
100 28029  100 28029    0     0  86243      0 --:--:-- --:--:-- --:--:-- 85978
configmap/prometheus created
clusterrole.rbac.authorization.k8s.io/prometheus-istio-system created
serviceaccount/prometheus created
clusterrolebinding.rbac.authorization.k8s.io/prometheus-istio-system created
service/prometheus created
deployment.extensions/prometheus created
metric.config.istio.io/requestcount created
metric.config.istio.io/requestduration created
metric.config.istio.io/requestsize created
metric.config.istio.io/responsesize created
metric.config.istio.io/tcpbytesent created
metric.config.istio.io/tcpbytereceived created
prometheus.config.istio.io/handler created
rule.config.istio.io/promhttp created
rule.config.istio.io/promtcp created
To install Grafana I installed HELM client, downloadid the Helm charts compatible with my ISTIO version and generated the yaml file using the instructions below:
helm template --set grafana.enabled=false --namespace istio-system install/kubernetes/helm/istio > off.yaml
helm template --set grafana.enabled=true --namespace istio-system install/kubernetes/helm/istio > on.yaml
diff -u off.yaml on.yaml > grafana.patch
I had to manually edit the unified diff file to resolve the differences and create the Istio manifest. Then apply the new created manifest:
kubectl apply -f grafana.yaml
configmap/istio-grafana-custom-resources created
configmap/istio-grafana-configuration-dashboards-galley-dashboard created
configmap/istio-grafana-configuration-dashboards-istio-mesh-dashboard created
configmap/istio-grafana-configuration-dashboards-istio-performance-dashboard created
configmap/istio-grafana-configuration-dashboards-istio-service-dashboard created
configmap/istio-grafana-configuration-dashboards-istio-workload-dashboard created
configmap/istio-grafana-configuration-dashboards-mixer-dashboard created
configmap/istio-grafana-configuration-dashboards-pilot-dashboard created
configmap/istio-grafana created
serviceaccount/istio-grafana-post-install-account created
clusterrole.rbac.authorization.k8s.io/istio-grafana-post-install-istio-system created
clusterrolebinding.rbac.authorization.k8s.io/istio-grafana-post-install-role-binding-istio-system created
job.batch/istio-grafana-post-install-1.1.11 created
service/grafana created
deployment.extensions/grafana created
Now you should be able to see those running in your cluster:
kubectl -n istio-system get svc prometheus
NAME         TYPE        CLUSTER-IP    EXTERNAL-IP   PORT(S)    AGE
prometheus   ClusterIP   10.108.6.86   <none>        9090/TCP   45m

kubectl -n istio-system get svc grafana
NAME      TYPE        CLUSTER-IP     EXTERNAL-IP   PORT(S)    AGE
grafana   ClusterIP   10.108.0.160   <none>        3000/TCP   9m39s
Open the Istio Dashboard via the Grafana UI, execute the following command:
$ kubectl -n istio-system port-forward $(kubectl -n istio-system get pod -l app=grafana -o jsonpath='{.items[0].metadata.name}') 3000:3000 &
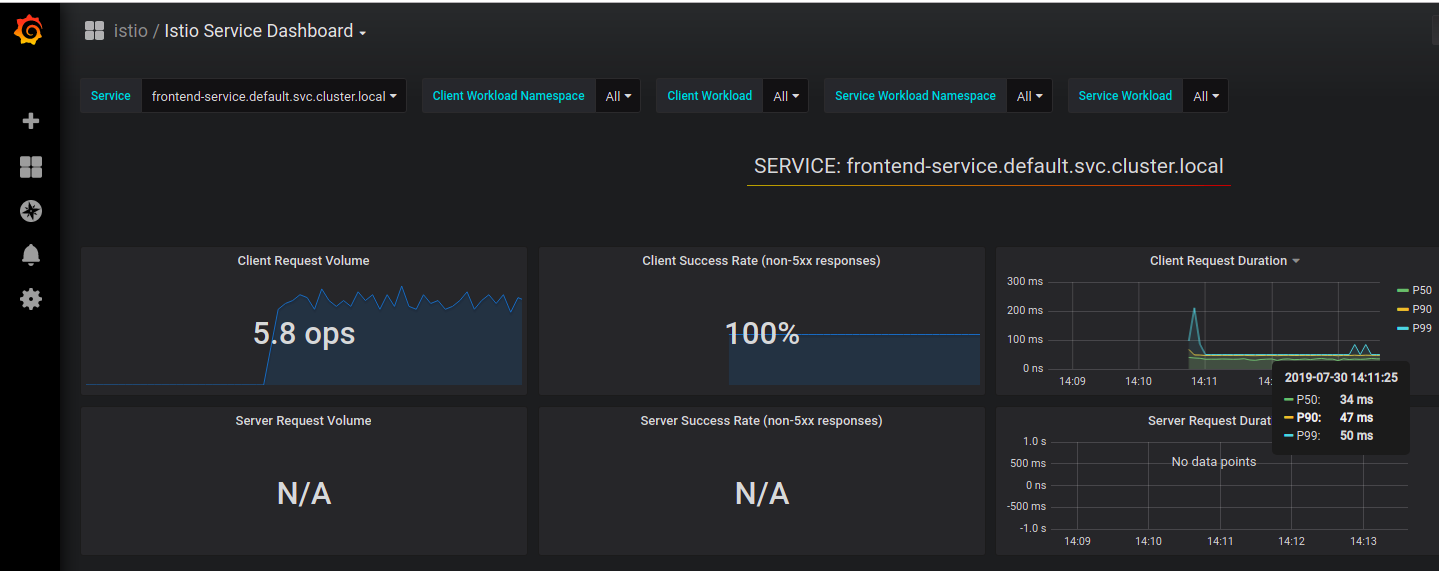
In a terminal I’m looping with while, through a number of curl requests in order to generate some traffic to the League App.
Visit http://localhost:3000/dashboard/db/istio-mesh-dashboard in your web browser and you should see something like this:
ISTIO is a complex APP which let you do a number of usefull things like:
- Traffic Management: Request Routing, Fault Injection, Circuit Breaking and more
- Security: Mutual TLS, Authorization and more
- Policies: Rate Limits, Control Headers and Routing and more
- Telemetry: Metrics, Logs, Distributed Tracing
I may do another blog post and demonstrate some of the functionalities but if you want to get a taste on how to accomplish some things using ISTIO Tasks checkout Bookinfo example, which is used by many on youtube to showcase how ISTIO works.
Conclusion
It was a long, but worthwhile journey to create and deploy the League App microservice.
- In the first blog post I created a simple serverless data ingestion pipeline, using Cloud Function.
- In the second blog post and the third blog post I created the application following Onion architecture principles and using GO-Kit microservice toolkit.
- In the fourth blog post I containerized the application and deploy on Minikube.
- This post is about productionalizing the application, by deploying it on the cloud, on a managed Kubernetes cluster and enabling ISTIO addon.